
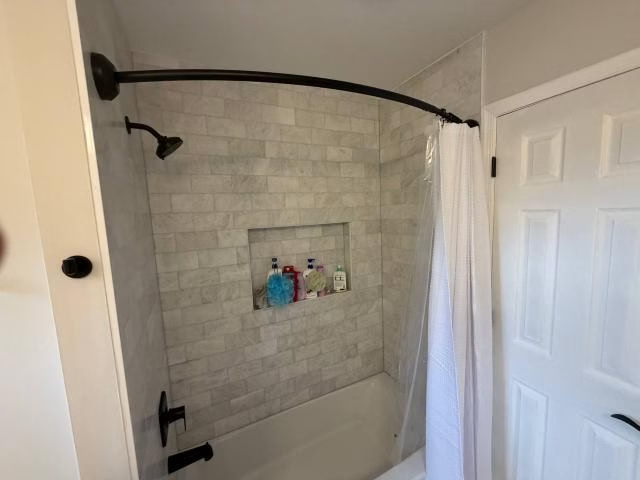
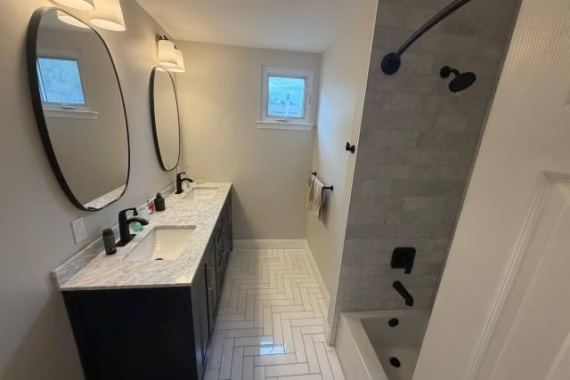
This completed bathroom remodeling project in Holland, PA focused on rebuilding the room with a more refined finish package while also addressing the preparation work behind the visible surfaces. BMR Belmax Remodeling completed demolition, wall and floor preparation, tub and shower waterproofing, plumbing fixture installation, electrical upgrades, marble tile work, trim restoration, painting, and final finish work as part of one coordinated project.
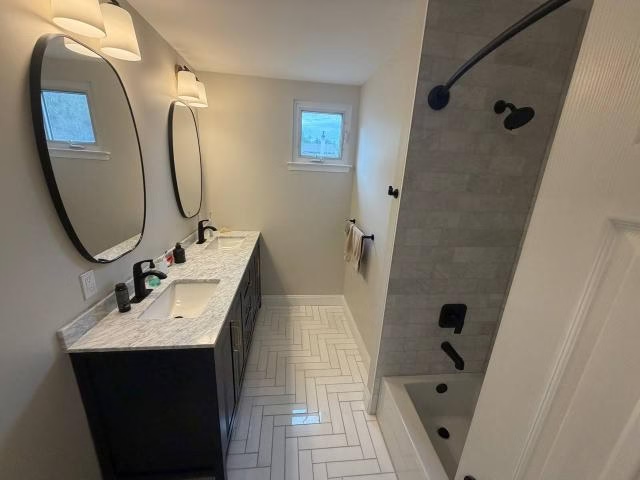
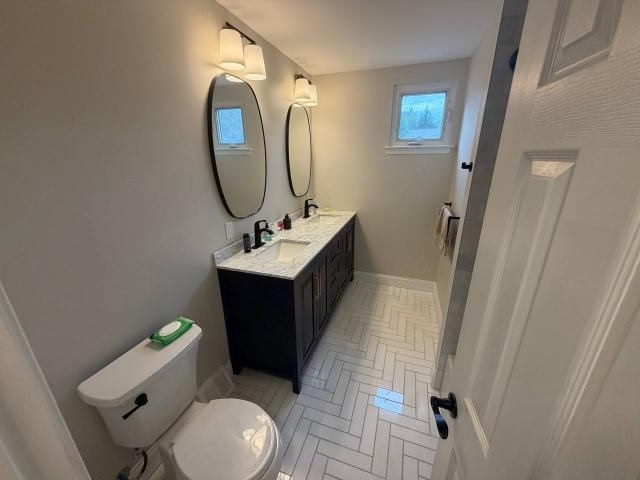
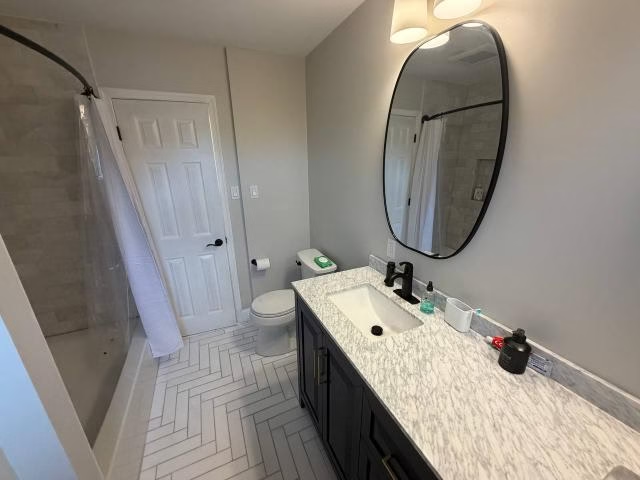
One of the most distinctive parts of this remodel was the use of marble tile in both the bathing area and on the bathroom floor. The tub and shower walls were tiled to the ceiling, while the bathroom floor received a herringbone layout. That combination gave the finished room a more detailed and custom appearance, but it also made substrate preparation especially important. The walls needed to be properly prepared for the selected tile, and the floor condition had to be evaluated before installation so the herringbone layout could be completed cleanly and accurately.
What This Project Included
- Demolition and preparation of the existing bathroom
- New mold-resistant drywall and cement board
- Waterproofing in the tub and shower area
- New bathtub and shower fixture installation
- Marble wall tile and herringbone floor tile
- Custom recessed niche
- Toilet and vanity faucet installation
- Additional bathroom outlets and vanity lighting
- Mirror or medicine cabinet installation
- Window trim restoration
- Baseboards, accessories, and painting
Main Construction Details
Demolition and Substrate Preparation
The project began with demolition of the existing bathroom finishes within the planned work areas. Removing the old surfaces made it possible to evaluate the underlying conditions and prepare the room properly for the new materials.
Mold-resistant drywall was installed where needed, while cement board was added in the tub and shower area and on the bathroom floor. The shower walls also required preparation and flattening before tile installation. That step was particularly important because smaller marble tile and more detailed patterns tend to show irregularities in the substrate more clearly than larger, simpler finishes.
The floor was another area that required attention before the finish tile went in. Because the planned floor pattern was herringbone, the existing floor had to be checked after demolition to confirm that it was sufficiently flat for the installation. The work order specifically called for stopping and reviewing the condition if additional leveling would be required, rather than assuming the floor could be tiled without adjustment.
Tub, Plumbing, and Fixture Work
A new bathtub was installed along with the necessary drain and overflow connections. The tub and shower faucet assembly was also installed as part of the remodel, along with new vanity faucets and the toilet installation or reset required for the final bathroom configuration.
Although these fixtures are visible at the end of the project, much of the important work happens behind the walls and beneath the finishes. Plumbing connections had to be coordinated before the wet-area surfaces were closed so the new fixtures could be installed cleanly without unnecessary disruption later.
The project was structured so that any damaged piping, inaccessible plumbing, or concealed conditions beyond the normal replacement scope would be identified and reviewed before additional work was performed. That helped keep the remodel controlled rather than allowing unexpected conditions to be buried behind the finished surfaces.
Waterproofing and Marble Tile Installation
The tub and shower area was waterproofed before tile installation. This was one of the most important technical phases of the project because the long-term performance of the finished bathing area depends on the assembly behind the tile, not only on the marble visible at the surface.
Marble tile was installed on the tub and shower walls all the way to the ceiling in a subway-style layout. Carrying the tile upward gave the bathing area a more complete appearance and helped create stronger visual continuity from the tub to the ceiling.
A custom recessed niche was also built into the bathing area, including framing, waterproofing, tile work, and finishing. This gave the homeowner practical built-in storage while maintaining a cleaner wall surface than surface-mounted shelves or accessories.
The bathroom floor received marble tile in a herringbone pattern. That layout gave the room a more distinctive character and required more precise alignment than a standard straight-set floor. A marble threshold was installed at the bathroom entry to complete the floor transition.
Electrical and Vanity Area Updates
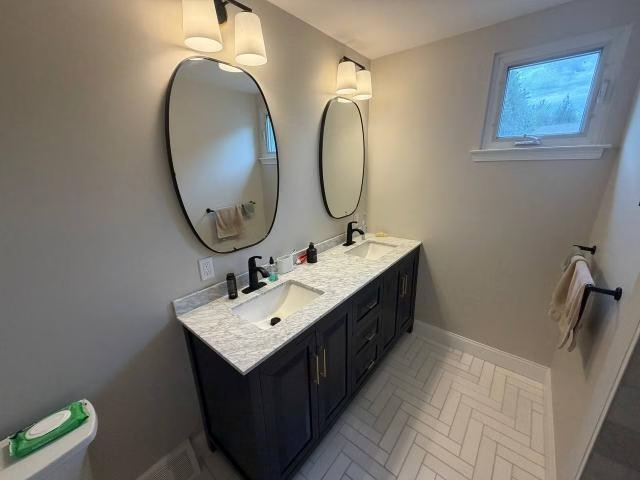
Electrical work included additional protected bathroom outlets and a new feed from the electrical panel area for those outlets, subject to the existing panel capacity and accessible routing. New vanity light fixtures were also installed above the mirrors or medicine cabinets.
These upgrades improved the practical use of the vanity area while also supporting a cleaner finished layout. The additional outlets gave the bathroom better electrical functionality for everyday use, and the new vanity lighting provided more focused illumination around the sink area.
Mirrors or medicine cabinets were installed as part of the finish work, helping complete the vanity wall and tying the lighting and storage together visually.
Existing Trim Restoration and Finish Work
One of the more specific details in this project was the decision to restore the existing window sill and trim rather than replace it automatically. The existing wood was sanded back where possible, prepared, and painted so it could remain as part of the finished bathroom.
This helped preserve a usable existing element while still bringing it visually into line with the newly remodeled space.
The project also included new baseboards in the affected areas, installation of bathroom accessories, painting of the entire bathroom, final cleanup, and preparation for client turnover.
Project-Specific Challenge: Preparing for a Detailed Marble Tile Installation
What makes this Holland bathroom remodel distinct is the amount of preparation required to support the selected tile package. The project did not rely on a simple straight-set ceramic installation. Marble was used in multiple areas, including a herringbone floor pattern and wall tile extending to the ceiling.
That meant the substrate condition mattered significantly. The shower walls had to be prepared and flattened before installation, while the floor had to be checked after demolition to confirm it was suitable for the herringbone layout. This was not a hidden floor-damage issue, but it was a real installation constraint that had to be addressed before the finish work could proceed.
The custom niche added another level of detail because it required framing, waterproofing, tile integration, and finish work within the same marble installation. Combined with the waterproofing and plumbing coordination, the project required more precision than a basic fixture-and-tile replacement.
Project Outcome
The completed bathroom now has a more cohesive and refined appearance, with marble finishes carrying through both the bathing area and the floor. The tile to the ceiling, herringbone floor pattern, recessed niche, updated fixtures, improved lighting, and restored window trim all contribute to a more complete final result.
Just as importantly, the project addressed the underlying preparation that supports those finishes. Cement board, waterproofing, substrate preparation, plumbing coordination, and electrical upgrades were all part of the work before the bathroom was closed and painted.
The result is a bathroom that feels more polished without being overdone, and one where the visible finish work is supported by the necessary preparation underneath.
Planning a Bathroom Remodel in Holland, PA?
Homeowners considering a bathroom remodel should think about more than the final tile and fixtures. Wall flatness, floor condition, waterproofing, plumbing access, and electrical capacity can all affect the installation and the finished result.
For homeowners researching bathroom remodeling in Holland, PA, this project is a good example of how detailed tile work and underlying preparation need to be planned together rather than treated as separate parts of the remodel.
Closing
This Holland bathroom remodel is a strong example of a project where waterproofing, substrate preparation, plumbing, electrical work, marble tile installation, trim restoration, and finish details all had to come together in one coordinated scope. BMR Belmax Remodeling completed the room as a more refined, better-prepared, and more cohesive bathroom designed for everyday use. And don’t forget your free estmate.